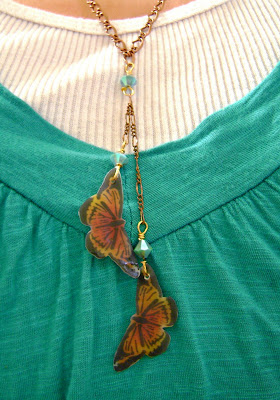
Ok...I am sooo on a roll with the new Stencil 1 mini stencils!! The sizes are so fun for so many different sufaces. Enough with the so's...anywhooo...I was recently gifted a bag of shrink plastic from my dear old craft hording mom, and thought, hmmm..I haven't used that stuff for a long time. and I made myself a butterfly necklace. Though..once my friend Mandy sees it, it probably won't belong to me anymore. :) below, you'll find a quick little tutorial on how to turn your favorite Stencil 1 image into a fun plastic charm!

The neccessary tools of this trade; Shrink Plastic, Stencil 1 mini chimp, and for comparison sake, the not-so-mini chimp, Stencil 1 Sprays, fine grade sandpaper, heat tool, scissors, poker to hold shrinking plastic down, some beads and findings to complete your jewelry piece.

Start by cutting a piece of shrink plastic and sanding it on both sides. (For this piece, I used the frosted shrink plastic, which is a frosty sheer.) Sanding in a cross hatch pattern will help the sprays stick to the plastic.

Color one side of shrink plastic, I used the sprays in Neon Pink, Neon Yellow and Blue. Spray just a few dots and then blot with a cosmetic sponge.

Turn shrink plastic over and sponge stencil designs with spray in black. Spray just once into a cosmetic sponge (for illustration of use watch; http://tinyurl.com/stencilsprayvideo ) and blot lightly through stencil.

Remove stencils...

Cut images out with scissors, along the edgs of design.

Using a holding device, I used a paper piercing tool..but you could use a popsicle stick or tweezers, and heat directly from the top with heat tool.

The plastic will start shrinking and warping..don't freak out..it will curl back out and flatten. Be sure to move the heat around to each part of the image to make it an even heating. These images are pretty small, so they are easy to shrink in this way. Something larger or more complex in shape may be better off in a toaster oven.

Once shrunk all of the way, you can use some kind of flat object to flatten out the charm...

Voila!

Here is the shrink comparison with the original sizes of the stencil..the charm on the left is really dark looking in this picture..which reminds me to mention..when adding color to the shrink plastic, always keep it light. The color becomes more concentrated as it shrinks and will intensify..

Chimp charms!!

Yeah..we made it to earrings!! Happy Chimp Charm Earrings!!


FANTASTIC, man!!!!! Great work, great idea!
ReplyDeleteA few years later..I say Thank YOu Ivan!! :)
ReplyDelete