Tuesday, July 28, 2009

How- to; Eraser Earrings


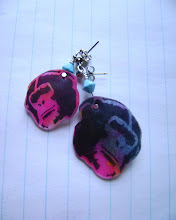
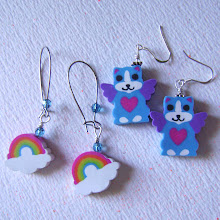
I love, love, love erasers. madly. This is one collection that I have managed to keep tame, in my massive hording of supplies..but I just couldn't resist these cutie little Lisa Frank erasers. As I tried to convince myself that indeed they should come home with me..I challenged me to make something with them..and thus the Eraser earrings were created..(loud claps of thunder in the background..)


Here are my two favorite designs from the pack..I added a few vintage crystals and some other silver findings to finish them off!


Here's what you need to make your own! Two really cute erasers..or not cute, if you prefer, two headpins, two earring hanger-y things and some jewelery making tools like needlenose plyers and wire cutters.


Carefully push a headpin through the core of the eraser. Go slowly so as not to go through the face of the eraser..this takes some practice.


Pull the pin the rest of the way through with the plyers and then wrap.


close-up of the wrapping..on another pair of star eraser earrings..Loop these on to the earrings and voila! Eraser earrings!


of course..now I'm looking at erasers in a whole new light..love me some donut earrings! or do I hear charm bracelet??

Wednesday, July 22, 2009

I'm on my Favorite Blog


So the Renegade Craft show was a Blast!! So many creative vendors, happy shoppers..treats and goodies to be seen everywhere! On saturday I had been showing my sister some cool posters from Seattle Show Posters, when my mom came into the booth to say there was somebody buying one of my canvases and that they wanted to meet me. So..without hesitation, I went straight back to my booth..and imagine my surprise when the customer turned out to be the lovely Cathe Holden, author of my favorite blog; Just Something I Made. It was like a Michael Jackson meeting Marlon Brando moment..I love your work, no I love Your work..it was great!! She thanked me in her write up for making her feel like a rock star..which she is! If you haven't checked out her blog..don't wait any longer! She always has great, useful projects with step by step intructions! Plus..she is a fellow Petaluman. Love her. The picture above is from her blog...doesn't the shelf with my Bodega canvas look great!? I'll be posting more this week of some of the goodies I picked up at the show..and I'll be updating my calender with next shows in the queue..next, next is another Mini maker faire at Copperfields on August 1st!

Wednesday, July 15, 2009

Renegade Craft Fair This Weekend


Come on down this coming weekend, July 18th and 19th..to the Festival pavilion at the Fort Mason center in San Francisco for two days of craft craziness! Rock n Roll crafts will have a booth, #97, featuring artwork and crafty goodies from moi, Elaine Barr, my mama, Kaethe Phelps and Stencils and books from Ed at Stencil 1. In fact Ed will also be doing book signings at the Chronicle books booth..and did I hear book Give-a-way!! We sure hope you can make it and come by to say hi!

Thursday, July 9, 2009

Hometown Demo


This coming saturday..I've been invited to show off my make at the Copperfields Mini Maker Faire! I'll be showing how to stencil t shirts, using a variety of methods. The mini faire starts at 11 am and will go till 1...Hope to see you there! ;) e

Wednesday, June 24, 2009

Shrink Plastic Stencil How To


Ok...I am sooo on a roll with the new Stencil 1 mini stencils!! The sizes are so fun for so many different sufaces. Enough with the so's...anywhooo...I was recently gifted a bag of shrink plastic from my dear old craft hording mom, and thought, hmmm..I haven't used that stuff for a long time. and I made myself a butterfly necklace. Though..once my friend Mandy sees it, it probably won't belong to me anymore. :) below, you'll find a quick little tutorial on how to turn your favorite Stencil 1 image into a fun plastic charm!


The neccessary tools of this trade; Shrink Plastic, Stencil 1 mini chimp, and for comparison sake, the not-so-mini chimp, Stencil 1 Sprays, fine grade sandpaper, heat tool, scissors, poker to hold shrinking plastic down, some beads and findings to complete your jewelry piece.


Start by cutting a piece of shrink plastic and sanding it on both sides. (For this piece, I used the frosted shrink plastic, which is a frosty sheer.) Sanding in a cross hatch pattern will help the sprays stick to the plastic.


Color one side of shrink plastic, I used the sprays in Neon Pink, Neon Yellow and Blue. Spray just a few dots and then blot with a cosmetic sponge.


Turn shrink plastic over and sponge stencil designs with spray in black. Spray just once into a cosmetic sponge (for illustration of use watch; http://tinyurl.com/stencilsprayvideo ) and blot lightly through stencil.


Remove stencils...


Cut images out with scissors, along the edgs of design.


Using a holding device, I used a paper piercing tool..but you could use a popsicle stick or tweezers, and heat directly from the top with heat tool.


The plastic will start shrinking and warping..don't freak out..it will curl back out and flatten. Be sure to move the heat around to each part of the image to make it an even heating. These images are pretty small, so they are easy to shrink in this way. Something larger or more complex in shape may be better off in a toaster oven.


Once shrunk all of the way, you can use some kind of flat object to flatten out the charm...


Voila!


Here is the shrink comparison with the original sizes of the stencil..the charm on the left is really dark looking in this picture..which reminds me to mention..when adding color to the shrink plastic, always keep it light. The color becomes more concentrated as it shrinks and will intensify..


Chimp charms!!


Yeah..we made it to earrings!! Happy Chimp Charm Earrings!!

Monday, June 22, 2009

Pillow was the Case that they gave me..


I posted this on Stencil1blog late last week. This has been my current craft obsession..patches and Pillowcase bags. I love thrift stores..not just for the pricing, but, honestly..where else would you find a clean, soft and lovingly used pillowcase from the 70's..for a dollar? Ok..the pricing probably is my favorite part. grin. :)

Once those pillocases come home..I can hardly use more than two at a time..so what to do? Well, I've been sewing them into bags! I cut the pillowcase in half and then close the bottoms, hem one of the tops and then sew one of them into the other..kind of doubling up the case. Add straps and you have a bag..but let's not stop there. I have also been going crazy with canvas patches. By spraying a nice piece of canvas fabric with a background color, heat set, spray stencil image, heat set and cut out. Now you have a patch that is ready to be sewn onto just about anything!!

Thursday, June 18, 2009

Husband Craft


The weeks before Maker Faire were..well..a maker's frenzy. There was so much stenciling and spraying that even my husband got into the act. Here are a few pictures of him spraying my logo onto the back of his shirt..:) love ya honey!


Wednesday, June 17, 2009

New Video featuring Stencil 1 Atc designs!


I just finished posting my newest video on youtube!
This time I'm showing you how to use the Stencil 1 sprays with the new Stencil 1 ATC designs. These are super mini and super fun!! I'm talking lil' pigeons, watertowers, background designs!! If you haven't seen them yet, head over to Stencil 1.com...now! :) and when you're done, see them in action!

Tuesday, June 2, 2009

Maker Faire


I just wanted to give a big shout out Thank You to the organizers of the Maker Faire, and all of the wonderful vendors and attendees! This is truly the Greatest Show on Earth! I can't wait for next year! See us next at the Renegade Handmade show at Fort Mason...:)

Tuesday, May 26, 2009

How to Stencil a T shirt Step by Step


Remember, these stencils are copyright and are for personal use only.

Here are the step by step pictures for making your own custom Stencil 1 t shirt.
Above are all of the supplies you'll need; A Stencil 1 Book; Stencil 101- full of totally rad stencil images, a color or two of Stencil 1 sprays..I'm using black and neon pink, a piece of cardboard or something absorbent to put inside the shirt, to protect the back from spray, an iron to heat set..and finally, a t shirt.


Before you start, be sure that the t shirt is 100% cotton and has been pre washed. This will make the inks last longer through wear and tear. Once the shirt is ready, slip a piece of cardboard inside. I forgot this part when I was taking the pictures and ended up with a shadow of a monkey on the backside of the tee..so don't forget the cardboard!


Lay the shirt flat with the side you want to spray facing up. These sprays dry pretty fast, so I don't usually tape down the stencil..but you can if you want to be sure it doesn't move in the process. You can also tape down some scratch paper along the outside of the stencil to protect the tee from overspray.. I love overspray, though! :)


Let the spraying begin! Try to hold the bottle upright and spray ahead of you, so the bottle won't get clogged up. And don't spray too much, as it will muddy the design. I would say, on average, a good 3-4 sprays on a large design should be plenty. You can always practice this on scratch paper or some old shirts..


This is after having sprayed the black..time to remove the stencil, carefully.


So, carefully lift the stencil and lay flat onto a piece of scratch paper. I like to keep a pad of paper or journal to catch all of the extra ink...it makes for great background paper later.


Voila..one pink earred, blushing chimp! Time to heat set..


To catch some of the extra ink that sits up on top of the fabric, iron with some sort of blotter..an extra piece of fabric, a piece of scratch paper. This iron is on a very low setting, no steam. We're trying to dry the ink, so we don't need any extra moisture. This part takes about a count of 15, moving the iron slowly back and forth.


Remove the blotter piece and heat set directly, again a good count of 15 should set a large sized image. Of course, the more spray you use, the more time it will take to set. Once this image is fully dry..it's ready to wear!


The finished shirt! To take care of this shirt, wash in cold water with a mild detergent and line dry. For all of the stencils and materials seen here please visit Stencil1.com. For more projects and crafts visit rocknrollcrafts.blogspot.com. Thanks!